Rust is the quiet saboteur of restorations. It creeps into seams, frames, and hardware, turning clean metal into headaches and rework. Whether you are reviving a classic or keeping a daily driver solid, smart rust-proofing pays back in safety, value, and time saved.
This post condenses proven strategies you can apply: choosing corrosion-resistant materials, preparing surfaces correctly, sealing moisture paths, and maintaining an inspection routine. We will outline what to do to build it once, protect it right, and keep it strong.
-
Stainless Steel: The Workhorse Upgrade
Stainless steel is an iron alloy with at least 10.5 percent chromium. That chromium forms an oxide that self-heals after light scratches, so it doesn’t turn into a red bloom.
Use it where splash and salt live: exhausts, brake and fuel lines, and patch panels in spray zones.
Pick the grade for the environment. 304 suits most builds. 316 resists chlorides on coasts and winter salt. Where joint strength is critical, keep coated Grade 8 fasteners and protect surrounding steel; use stainless where strength allows.
Plan the fab work. Fit tight, control heat with beads, clean heat tint, then passivate. Use stainless-only brushes and gloves.
Block galvanic attack when stainless steel meets carbon steel. Coat both faces, add nylon or rubber washers, and use a light anti-seize on threads.
Expect higher cost up front, longer life overall. Fewer do-overs and no red rust mean less rework.
-
Aluminum And Composites For Clean, Light Parts
Aluminum is a light, nonferrous metal that doesn’t make red rust. Use it for radiators, tanks, and nonstructural skins.
Prep sets the bond. Degrease, scuff to bright metal, then prime the same day. Epoxy over fresh abrasion locks the oxide so the paint bonds.
Break galvanic pairs. Aluminum against steel or stainless pits in salty moisture. Coat faces, add nylon or rubber washers, and thin anti-seize on threads. Keep drains open.
Treat fasteners as part of the system. Use stainless or coated hardware with isolators. Recheck after the first season; fix any dark halos.
Composites are fiber-reinforced materials that don’t corrode. They suit trim, spoilers, and splash-exposed covers. Seal cut edges, use non-conductive spacers, and protect abraded spots.
Keep steel where strength matters.
-
Stainless Steel Passivation
Passivation is a chemical cleaning that removes free iron and rebuilds the chromium-oxide film so stainless resists corrosion again.
Work in a clean sequence. Degrease first. If welds show straw or blue heat tint, remove it with pickling gel or a light mechanical clean. Rinse well, then passivate with a citric solution or other approved chemistry that dissolves free iron without changing dimensions.
Rinse, neutralize, and dry. Give the part a thorough water rinse, apply a mild neutralizer if the chemistry calls for it, and dry with clean air. Treat the whole piece after final welding so the passive film is uniform.
Keep your tools honest. Use stainless-only wire brushes and fresh abrasives. Handle with clean gloves and store parts away from carbon-steel grinding dust. Use stainless, plastic, or well-coated fixtures so you don’t re-contaminate the surface.
Verify the result. A simple water-break test should sheet evenly on a clean, passive surface. Where policy allows, a quick copper sulfate check can confirm free iron is gone.
Don’t passivate mixed assemblies. Pull carbon-steel hardware and masking before treatment, then reinstall after the part is dry.
If you outsource, look for stainless steel passivation services like Astro Pak that perform on-site citric passivation and precision chemical cleaning to restore corrosion resistance after fabrication.
-
Galvanized And Galvanealed Steel Panels
Galvanized steel is carbon steel with a bonded zinc layer; the zinc corrodes first and shields the base metal. It is heat-treated, so the zinc-iron surface turns matte and paint-friendly.
Choose by location. Use galvanized on hidden structures and heavy-spray zones. Use galvanized where you want a smooth, durable paint finish on outer skins.
Treat welds like bare steel. Heat burns off zinc. After grinding, clean, prime with a zinc-rich product, and seal the lap to block wicking.
Paint over zinc with a compatible stack: degrease, scuff, epoxy or approved primer, then sealer and color. Chips happen; zinc buys you time.
Mind process details. Add vent and drain holes in boxed sections, mask bores, chase threads, and clean ground pads.
Put zinc on floor pans, rockers, crossmembers, hangers, and brackets.
-
Avoid Galvanic Surprises When Mixing Metals
Galvanic corrosion is a reaction between dissimilar metals in moisture that sacrifices the less noble metal. Steel at the joint rusts faster than stainless or aluminum in wet salt.
Break the circuit: coat both faces, add nylon or rubber washers, and use anti-seize on threads.
Keep hardware families consistent. All stainless on stainless brackets, all zinc-plated on zinc-coated panels. If you mix, isolate with cured coatings and non-conductive spacers, then reseal edges so water can’t wick.
Choose grades for exposure. 304 suits most roads; 316 resists chlorides on coasts and salted winters. For high clamp loads, use coated Grade 8 and protect steel.
Prevent galling: use anti-seize, avoid dry installs, and retorque after the first heat cycle.
-
Epoxy Primer And Modern Paint Systems
Epoxy primer is a two-part coating that bonds to bare steel and seals out air and water. Use it first so rust has no path.
Prep sets the bond: strip or blast, create an 80 to 120 grit profile, blow off dust, solvent-wipe, and shoot epoxy the same day.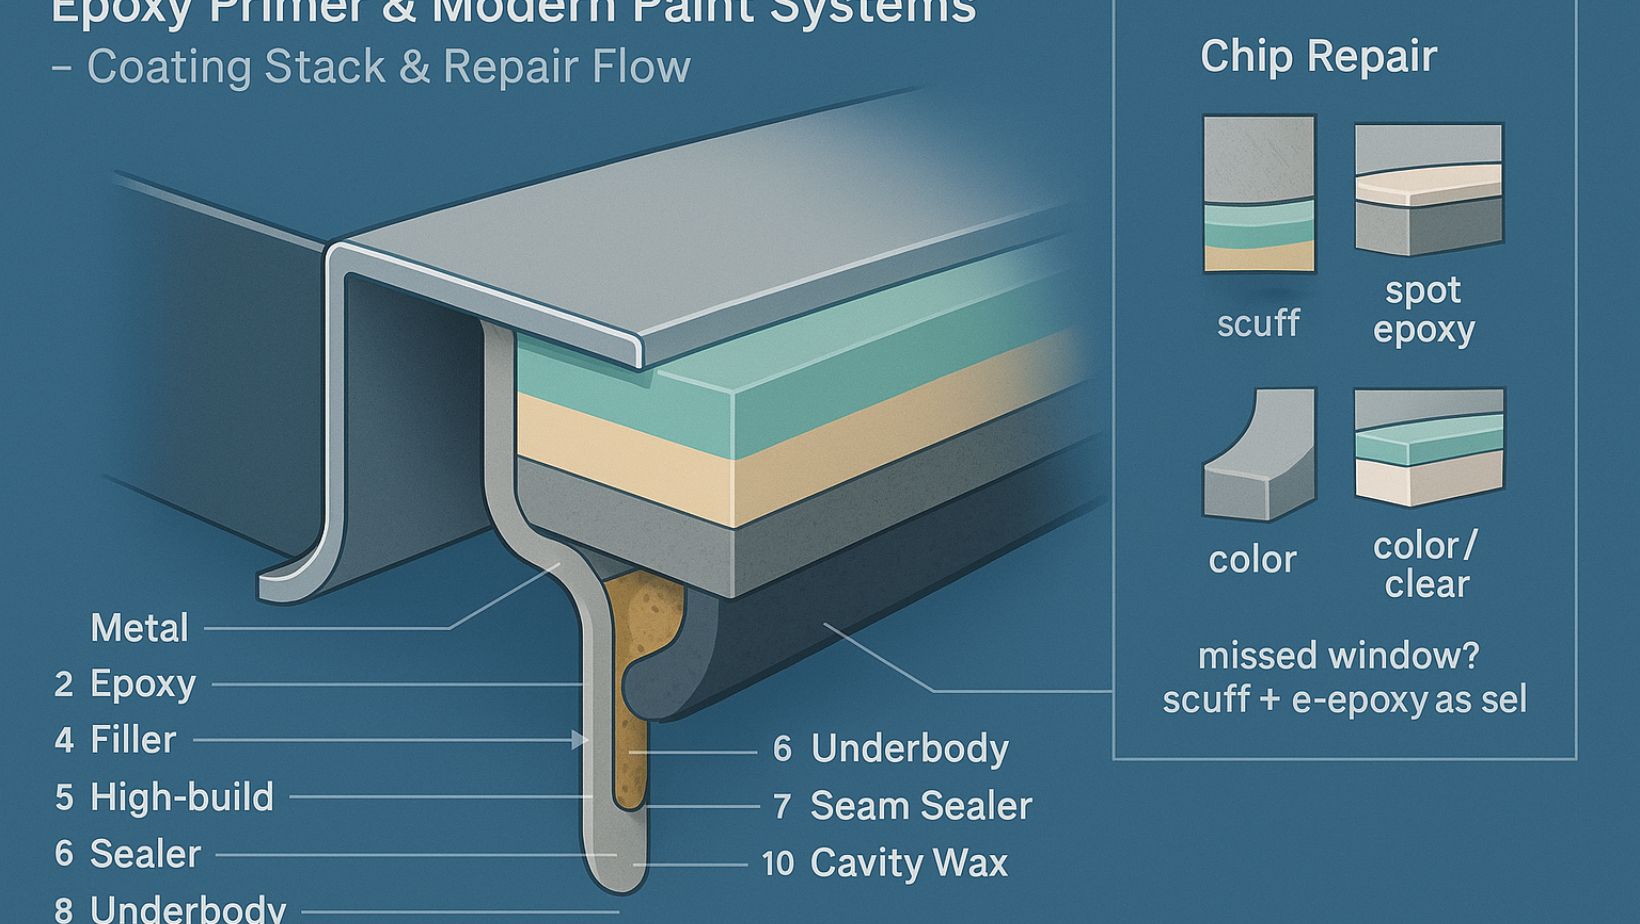
Coat more than the pretty side. Hit floor pans, rockers, jambs, engine bay, and hem flanges. Feather cut lines so chips don’t start there.
Build a stable stack: epoxy to metal, filler within recoat window, then high-build, block, sealer, base, and clear. If you miss the window, scuff and re-epoxy as a sealer.
Film matters. Two medium coats beat one heavy pass. Fix any nick in steel the day you see it.
-
Powder Coating For Components
Powder coating is a dry electrostatic finish that cures into a film and keeps water and salt off steel.
Prep: blast to bright metal, solvent wipe, and pre-bake porous castings to outgas. Use a clean ground; hang on bare hooks.
Build and cure right. Target 3 to 5 mils and a full part-temperature cure. Too thin chips; too thick can crack or bind fits.
Cover edges and pockets by adjusting gun voltage and angle to push into hems and recesses.
Pick chemistry by exposure: polyester for sun, epoxy for chemicals. A zinc-rich powder primer adds sacrificial protection.
Mask threads, bores, and ground pads; chase threads after cure. Repair chips: clean, scuff, spot epoxy, touch up.
-
Zinc Protection: Galvanizing And Plating
Zinc protection is a sacrificial layer that corrodes first and shields the steel beneath.
Hot-dip galvanizing builds a thick, bonded zinc layer inside and out. Use it on frames, crossmembers, spring hangers, and brackets that live in spray. If you’ll paint over it, sweep, blast, or pretreat, then epoxy prime so the bond lasts.
Electroplating is thinner for hardware and tight fits. It lasts less in salt than hot-dip, but it assembles cleanly. Add a trivalent conversion finish where the spec allows for extra life.
Mind fasteners. High-strength bolts can absorb hydrogen during plating. If you plate class 10.9 or 12.9 hardware, specify a bakeout after the plate. Recheck the torque because coatings change friction.
Plan the flow before coating. Add vent and drain holes so zinc reaches the boxed sections. Mask precision bores and ground pads. After coating, chase threads and clean grounds so your fasteners’ torque and electronics read true.
Restore cut and heat-affected areas. Welding destroys zinc at the seam. Grind, weld, clean, then prime with a zinc-rich product and seal the joint so moisture can’t wick in.
-
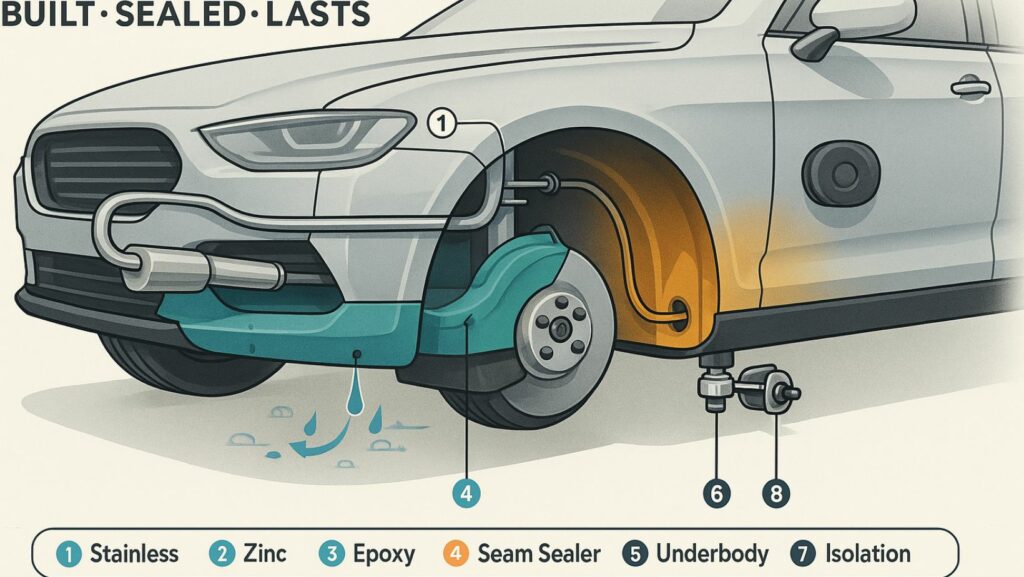
Underbody Sealants, Seam Sealer, And Cavity Wax
Underbody coating is a thick, flexible film that absorbs gravel and blocks brine. Seam sealer bridges laps and welds. Cavity wax creeps to coat boxed sections and hems.
Start on clean, dry steel that’s already epoxied. Don’t coat over bare metal or active rust.
Cover wheel wells, floorpans, inner fenders, and the backside of rockers with soft edges. Mask pads, threads, joints, and grounds. Keep drains and weep holes open.
Seal seams before color. Over cured epoxy, run paintable seam sealer, tool flat, and bridge corners. If you can reach both sides, seal both.
After curing, fog doors, rockers, pillars, rails, and flanges with a 360-degree wand, working low to high. Wipe the weep edges.
Use one maker’s system; avoid silicone near paint. Fix chips when you see them: clean, dry, spot epoxy, and recoat.
-
Eliminate Water Traps
A water trap is any pocket where water lingers without airflow. Shape parts so water leaves fast and surfaces dry.
Build drainage. Set low points in floors, rockers, and trunk wells. Add weep holes there, not on the flange. Deburr and prime edges, then use removable rubber plugs. Size drains: 6 to 8 mm clear road silt.
Make panels shed, not store. Add a slight crown and 1 to 2 mm fall per 300 mm. Turn sharp flanges outward and radius corners so sealers bridge.
Vent behind shields. Use standoffs and leave a small gap at the bottom of the sound deadener.
Choose materials that don’t drink. Use closed-cell foam and butyl pads. Seal edges and leave a breath gap.
Test before painting with a gentle hose and adjust until pooling stops.
-
Use Proper Welding Techniques
A weld is a high-heat joint that can burn coatings and create crevices where corrosion starts. Weld clean, finish clean, and seal every path moisture could find.
Fit tight, bright metal. Strip both sides, solvent-wipe, and handle with clean gloves.
Match the joint to the job. Plug welds for laps; continuous welds for butt joints, you’ll seal from both sides. Avoid gaps that force bridges.
Mist weld-through primer on laps. Flash, then run a hot, brief puddle to burn through without trapping primer.
Control heat. Short beads, skip-weld, and use copper backing to keep panels straight.
Finish without thinning edges. Dress high spots and chase pinholes.
Seal both sides. Epoxy, then seam sealer. After coloring, fog the cavity wax inside the flange.
-
Design For Accessibility
Accessibility means you can see, clean, and recoat rust-prone spots.
Add service holes at low points on rockers and rails, away from high-stress corners. Size of the tool: 10 to 12 mm for a borescope or rinse tube, 18 to 22 mm for a wax wand. Deburr, prime the edge, and cap with tight rubber plugs.
Make shields removable with rivnuts or threaded inserts and corrosion-resistant bolts. Add large washers to protect the paint.
Leave straight tool paths when you box sections to flush and verify coverage.
Standardize fasteners: common sizes, anti-seize on threads, heads where a socket fits. For yearly waxing, use captive nuts and accessible heads.
Close what you open. After checks, fog cavity wax, wipe weep edges, and touch up nicks with epoxy and color.
-
Maintain Structural Integrity
Structural integrity is your repair’s ability to carry load paths. Fixes matter only if the structure stays strong.
Plan drains without weakening rails. Put deburred holes at low points, at least one thickness from bends. Size 6 to 8 mm and prime the cut edge.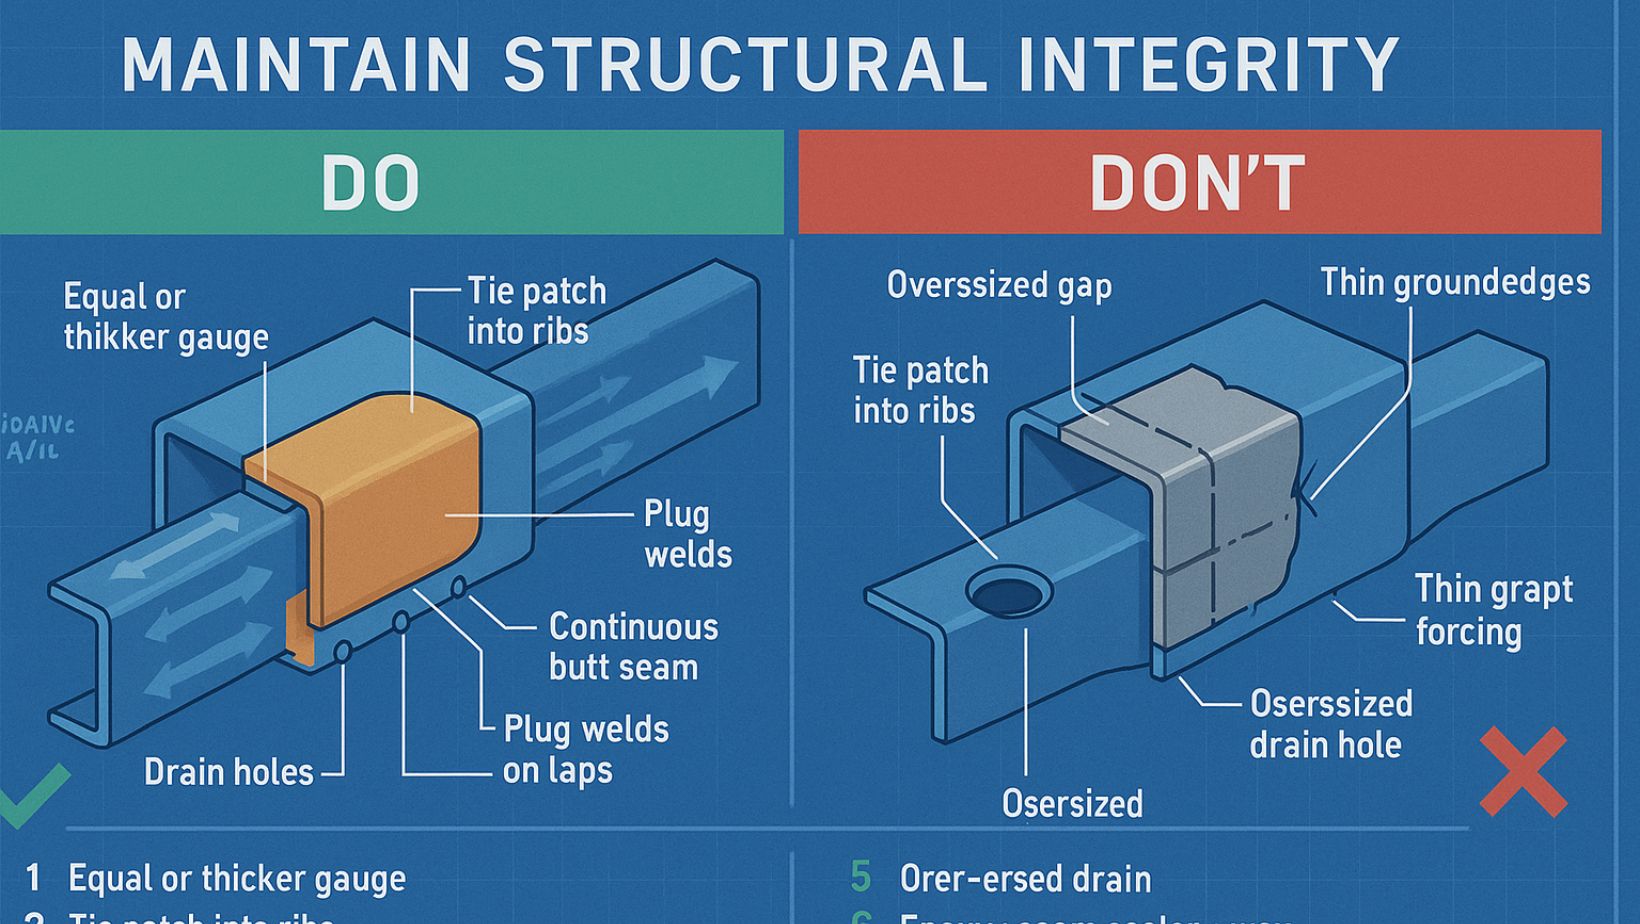
Match the metal you replace. Use equal or thicker gauge, mirror stampings, and tie patches into ribs to restore stiffness with shape. Fit tightly to limit heat and distortion.
Choose joints wisely. Plug weld laps; use continuous welds on butt joints, you can seal from both sides. Avoid gaps that force bridge welds.
Grind with restraint, then seal. Dress high spots, stop before edges go thin, chase pinholes, epoxy, seam seal, and wax the hidden face before color. Torque fasteners to spec.
-
Regular Cleaning, Especially In Winter
Winter cleaning removes salt and grit before they trap moisture on steel.
Rinse the undercarriage within 24 hours of exposure. Aim at wheel wells, control arms, crossmembers, pinch welds, and liners. Use cold water to avoid steaming salt into seams.
Wash top to bottom with pH-balanced soap, a soft mitt, and clean towels. Rinse trim edges and badges. Dry lower seams and door bottoms.
Finish with a short drive to push air through pockets. In the shop, pull service plugs, vent cavities, then reseat.
Give wheels and liners extra time. Keep the door and rocker drains clear. Wax before winter; refresh in spring.
-
Periodic Inspections
Periodic inspections are scheduled checks that catch corrosion early and keep repairs small.
Set a rhythm you’ll keep: quarterly for hobby cars, at each oil change for daily drivers, within 48 hours after heavy salt.
Start where grime lives: wheel wells and behind liners. Look for lifted undercoat, chipped epoxy at pinch welds, and mud at fender lips.
Get under the car. Scan rails, crossmembers, spring perches, and exhaust hangers. Mark chips, decontaminate, spot epoxy, and topcoat.
Check rub points: body mounts, bumper brackets, sway bar tabs, leaf spring clamps. Red or brown dust means seal that edge.
Verify cavities and drains. Open weep holes, pull plugs, borescope inside, and fog wax if a flange looks bare. Keep a photo log.
-
Advanced Anti-Corrosion Coatings
A ceramic-reinforced clear is a sprayed topcoat that adds hardness; wipe-on “ceramic coatings” mainly aid cleaning, not structure.
On exteriors, use high-solids ceramic clears over a base/clear to resist micro-abrasion and shed water. Underneath, choose ceramic-filled urethanes or polyurea/bedliner films for elastic protection.
Always build on epoxy: degrease, abrade, epoxy prime, then apply. Verify dry film and honor cure time. Self-healing binders can close hairline marks when warm, but won’t fix gouges. Hydrophobic topcoats speed washing yet don’t replace rinses, wax, or underbody refresh.
Keep systems compatible: one maker’s primers, sealers, and topcoats. Control temperature and humidity, feather sharp edges, and when damaged, clean, scuff to sound film, spot epoxy exposed steel, and recoat to restore the barrier.
-
Improved OEM Corrosion Techniques You Can Borrow
E-coat is an electrodeposited primer that reaches seams and boxed sections. Panel bond is a two-part adhesive that seals lap joints and spreads load.
Send the shell or frame for e-coat after blasting. Plan hang points, add vents/drains, and mask threads and ground pads.
After the dip, scuff e-coat, follow system notes, then build surfacer, sealer, base, and clear. Where needed, scuff to fresh tooth and use the approved primer path.
Use panel bond where strength allows. Clean to bright metal or approved primer, tooth both faces, dry-fit, full bead, clamp, and close ends. After curing, seam-seal the edge and fog the cavity with wax.
Upgrade splash-zone hardware to stainless or zinc-rich alloys; passivate after weld cleanup.
-
Data-Driven Corrosion Monitoring
Data-driven corrosion monitoring uses simple sensors and repeated photos to catch rust early.
Place humidity/temperature loggers in a wheel-well splash zone and inside a boxed rail, shielded from spray. Trigger: if RH stays above 65 percent for 72 hours after salt, rinse, and inspect. Track storm mileage; if brine distance exceeds 100 km between rinses, move the unit forward. Build a monthly photo baseline from the same angles. Turn alerts into tasks and log after-photos. Use smart films as sentries, not fixes. Each season, review logs and add drains or isolators where alerts repeat.
FAQ
- Can stainless steel rust?
Yes. Stainless can stain or pit if its passive chromium-oxide film is damaged, contaminated, or oxygen-starved.
Pick alloys with intent: 304 for most roads; 316 for coastal air and winter salt.
Keep it passive: wash off film and salt, avoid carbon-steel brushes and shared abrasives, and passivate after fabrication.
Isolate joints with coatings and nonconductive washers. Use light anti-seize on threads.
- Should we passivate stainless steel after fabrication?
Yes. Passivation is a chemical cleaning that removes free iron and rebuilds the chromium-oxide film so stainless resists corrosion again.
Do it after final welding: degrease, remove heat tint, rinse, then apply a citric passivation per spec. Rinse, neutralize if required, and dry. Use stainless-only tools and clean gloves. Verify with a water break; where allowed, use copper sulfate.
- Will stainless fasteners cause rust on steel panels?
Yes, if you give them a path. Stainless steel is more noble than carbon steel, so a wet joint can drive corrosion in the steel.
Break the circuit: coat both faces for paint-to-paint contact. Add nylon or rubber washers plus a coated flat washer. Use light anti-seize on threads to block wicking.
All stainless on stainless; all zinc-plated on zinc-coated. If you must mix, isolate with cured coatings and nonconductive spacers, then reseal edges.
For high clamp loads, use coated Grade 8 and retorque after the first heat cycle.
Conclusion
Corrosion control is simple: protect the metal. We do it with smart materials, a stable paint stack, sealed joints, and steady care. Used together, these moves block oxygen, water, and salt for the long haul. A stainless tank, an epoxy-primed and sealed frame, and fresh cavity wax turn old trouble spots into quiet zones. Shops earn trust with builds that stay solid. Owners drive without dread. Fleets cut downtime and keep resale strong.
Your next three moves:
- Lock down bare steel with epoxy, then seal laps and hems before color.
- Isolate dissimilar metals and spec stainless or zinc protection where the spray is constant.
- Put maintenance on a calendar: rinse in winter, inspect quarterly, refresh cavity wax every 12 to 24 months.
Stay curious and current. Borrow factory methods like e-coat coverage and bonded laps, adopt tougher underbody films as they mature, and keep access points open so service stays easy. Rust never quits, but with a tight plan and steady habits, it never gets a start.